With people's awareness of the decoration does not improve, in the bathroom renovation, will naturally choose to shower this bathroom products, let us come back after work can enjoy the shower experience, but the shower room installation process, what needs attention? Today we will take a closer look at the installation of the shower room .
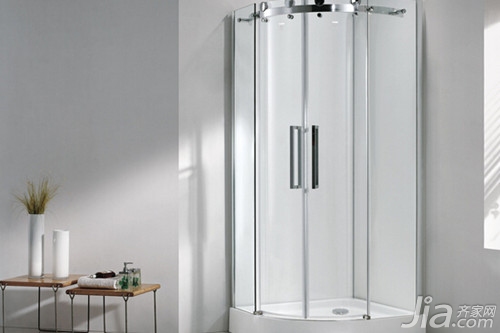
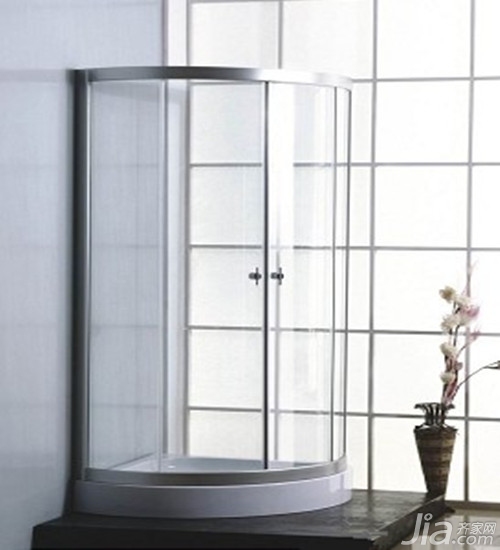
Shower room has a small footprint, can effectively achieve wet and dry separation, winter can play a number of advantages such as insulation, water vapor gathered in a narrow space, the heat will not quickly lost, the entire space is warm and comfortable. The comfort of the shower room is closely related to the installation. Therefore, the installation of the shower room is also very particular.
1. Prepare and install the bottom basin : Regular shower room manufacturers will send professionals to come to the door to install, use the tool to carry together, more quickly and conveniently. The installation of the bottom basin must be careful, and testing the water is an indispensable part. If the house is installed, it may be difficult to make larger changes.
2. Pre-installation preparation : See if the product packaging is complete. After opening, check whether the configuration is complete. Prepare necessary tools for use and put them together for easy access.
3. Install the bottom basin : Assemble the bottom basin parts and adjust the level of the bottom basin to ensure that there is no water in the basin or the pelvic floor. The hose can be telescopic with the distance, connecting the pelvic floor with the floor drain.
4. Tests, protection (important links) : Tests are required after installation to ensure unobstructed access to water. The installed bottom basin should also be protected in time before the installation of the house.
5. Housing installation : The safety of the shower room has an important relationship with whether the installation of the room is formal or not. Finding whether the hole is accurate, whether the fitting is properly installed, and whether the waterproof seal is done properly affects the normal use of the product. The strength and angle of installation are also difficult for ordinary people to grasp.

6. Finding and punching holes : Make sure that the pipes in the bathroom are in a row and prevent the concealment of pipes when they are punched. Use a pencil and a level rule to determine the drilling position of the aluminum material against the wall, and use the impact drill to drill holes.
7. Install aluminum (important link) : Knock in the rubber particles at the drill hole and lock the aluminum bar to the wall with screws. Pay attention to the need to continuously adjust while installing to maintain the verticality of the aluminum material.
8. Fixed glass (important link) : The glass is clamped and locked at the drilling hole of the bottom basin. The bottom of the flat glass or curved glass falls into the glass clamp groove and slowly pushes into the wall aluminum material. Then use screws to fix it.
9. Install the top pipe : Find the corresponding location above the fixed glass drill, install (straight/oblique) holder and connect the top pipe. Fix it to the top of the glass with a bender sleeve.
10. Equipment racks : Position the racks, tighten the plate nuts, and fix the plate glass to keep it vertical and horizontal. Pay attention to waterproofing under fixed glass aluminum.
11. Install the movable door (important link) : Install the hardware of the active door and install the hinge at the reserved hole of the fixed door. After loading, adjust the position of the axis of the lotus leaf until the door feels best.
12. Do a good job of waterproofing (important link) : Install a suction or water blocking strip on the side or bottom of the glass as required. Seam the aluminum with the wall, the glass and the bottom pot joint seam tightly with silicone.
13. Debugging and tightening (important links) : Check whether the various parts are comfortable and smooth, and find that problems should be adjusted in time. After adjusting, tighten the corresponding screws to make the shower room more secure.
14. Finishing work : The decorative aluminum strip is stuck in the wall aluminum to ensure its neat appearance. Finally wipe the entire shower room with a rag.
The above is a brief introduction of the installation of the shower room , I hope to help your bathroom life, more exciting content, all in this site, so stay tuned.
More articles:
Small family bathroom recommended what is a wall toilet
What are the barrel sizes of healthy and comfortable bathroom products?
What shower room ten shower room recommended
Toilet brand recommended toilet which brand is good
Shower room glass door
pot magnet:
The Pot Magnet with Countersunk have a countersunk hole in the
front (magnetic) face and can be easily fixed in place with a countersunk screw
(M4, M5 and D8). They are ideal for using in fixing applications such as Point
of Sale Displays, Exhibitions, Marketing Displays, Doors, Panels, False
Ceilings and Light Fixtures and Fittings.
The POT Magnet has a maximum operating temperature of +180 deg C with ferrite,
+550 deg C with Alnico and +200 deg C with NdFeB, 350 deg C with Smco Magnet.
pot magnet:
1.Material:polished steel and
NdFeB,Ferrite,AlNiCo,SmCo
2.Coating:Cr,Ni,Zn & ect.
3.Pull force:>=5N
Applications:
Sale Displays, Exhibitions, Marketing Displays, Doors, Panels, False Ceilings and Light Fixtures and Fittings.
|
Item No. |
Description(MM) |
Magnet |
COATING |
Pull Force |
|||||
|
|
POT |
|
|
|
|||||
|
|
Material |
A |
B |
C |
D |
E |
|
|
|
|
HF-PT1010 |
Fe37 |
10 |
4.5 |
M3 |
11.5 |
|
Ferrite |
Zn |
4 |
|
HF-PT1013 |
Fe37 |
13 |
4.5 |
M3 |
11.5 |
|
Ferrite |
Zn |
10 |
|
HF-PT1015 |
Fe37 |
15 |
5 |
M4 |
17 |
|
Ferrite |
Zn |
15 |
|
HF-PT1016 |
Fe37 |
16 |
4.5 |
M3 |
11.5 |
|
Ferrite |
Zn |
18 |
|
HF-PT1020 |
Fe37 |
20 |
6 |
M3 |
13 |
|
Ferrite |
Zn |
30 |
|
HF-PT1022 |
Fe37 |
22 |
7 |
M5 |
17 |
|
Ferrite |
Zn |
35 |
|
HF-PT1022A |
Fe37 |
22 |
6 |
M5 |
16 |
|
Ferrite |
Ni |
35 |
|
HF-PT1022B |
Fe37 |
22 |
6.5 |
M5 |
16.5 |
|
Ferrite |
Zn |
35 |
|
HF-PT1023 |
Fe37 |
23 |
7 |
M5 |
20 |
|
Ferrite |
Zn |
35 |
|
HF-PT1025 |
Fe37 |
25 |
7 |
M4 |
15 |
|
Ferrite |
Zn |
40 |
|
HF-PT1032 |
Fe37 |
32 |
7 |
M5 |
23 |
|
Ferrite |
Zn |
80 |
|
HF-PT1032A |
Fe37 |
32 |
7 |
M6 |
23 |
|
Ferrite |
Zn |
80 |
|
HF-PT1032B |
Fe37 |
32 |
7 |
M4 |
15 |
|
Ferrite |
Zn |
80 |
|
HF-PT1057 |
Fe37 |
57 |
10.5 |
M6 |
15.5 |
|
Ferrite |
Black paint |
280 |
|
HF-PT1063 |
Fe37 |
63 |
14 |
M8 |
27 |
|
Ferrite |
Zn |
350 |
|
HN-PT1010 |
Fe37 |
10 |
4.5 |
M4 |
12.5 |
|
NdFeB |
Zn |
25 |
|
HN-PT1013 |
Fe37 |
13 |
4.5 |
M5 |
12.5 |
|
NdFeB |
Zn |
30 |
|
HN-PT1014 |
Fe37 |
14 |
12 |
M5 |
29 |
|
NdFeB |
Ni |
40 |
|
HN-PT1016 |
Fe37 |
16 |
4.5 |
M6 |
12.5 |
|
NdFeB |
Zn |
60 |
|
HN-PT1016A |
Fe37 |
16 |
4.5 |
M5 |
14.5 |
|
NdFeB |
Zn |
60 |
|
HN-PT1016B |
Fe37 |
16 |
5 |
M4 |
13 |
|
NdFeB |
Ni |
60 |
|
HN-PT1016C |
Fe37 |
16 |
4.5 |
M6 |
36.5 |
|
NdFeB |
Zn |
60 |
|
HN-PT1018 |
Fe37 |
18 |
7 |
M5 |
17 |
|
NdFeB |
Zn |
100 |
|
HN-PT1020 |
Fe37 |
20 |
7 |
M5 |
17 |
|
NdFeB |
Zn |
100 |
|
HN-PT1020A |
Fe37 |
20 |
7 |
M6 |
14 |
|
NdFeB |
Zn |
100 |
|
HN-PT1020B |
Fe37 |
20 |
6 |
M6 |
16 |
|
NdFeB |
Zn |
140 |
|
HN-PT1020E |
Fe37 |
20 |
7 |
M5 |
17 |
|
NdFeB |
Zn |
100 |
|
HN-PT1020F |
Fe37 |
20 |
6 |
M6 |
16 |
|
NdFeB |
Zn |
120 |
|
HN-PT1020G |
Fe37 |
20 |
7 |
M4 |
15 |
|
NdFeB |
Zn |
110 |
|
HN-PT1022 |
Fe37 |
22 |
7 |
M5 |
17 |
|
NdFeB |
Zn |
150 |
|
HN-PT1025 |
Fe37 |
25 |
7 |
M6 |
17 |
|
NdFeB |
Zn |
270 |
|
HN-PT1025A |
Fe37 |
25 |
7 |
D10 |
25 |
|
NdFeB |
Zn |
270 |
|
HN-PT1025B |
Fe37 |
25 |
7 |
M6 |
17 |
|
NdFeB |
Zn |
270 |
|
HN-PT1025D |
Fe37 |
25 |
7 |
M6 |
17 |
|
NdFeB |
Zn |
215 |
|
HN-PT1025E |
Fe37 |
30 |
5 |
M6 |
25 |
|
NdFeB |
Ni |
300 |
|
HN-PT1030 |
Fe37 |
30 |
5 |
M6 |
28 |
|
NdFeB |
Zn |
220 |
|
HN-PT1032 |
Fe37 |
32 |
7 |
M6 |
10.5 |
|
NdFeB |
Zn |
300 |
|
HN-PT1032A |
Fe37 |
32 |
7 |
M6 |
19 |
|
NdFeB |
Zn |
300 |
|
HN-PT1032B |
Fe37 |
32 |
7 |
M6 |
17 |
|
NdFeB |
Zn |
360 |
|
HN-PT1032C |
Fe37 |
32 |
7 |
M6 |
17 |
|
NdFeB |
Rubber |
160 |
|
HN-PT1032D |
Fe37 |
32 |
7 |
M6 |
12 |
|
NdFeB |
Zn |
350 |
|
HN-PT1032F |
Fe37 |
32 |
7 |
M4 |
15 |
|
NdFeB |
Ni |
350 |
|
HN-PT1035 |
Fe37 |
35 |
7 |
M6 |
19 |
|
NdFeB |
Zn |
300 |
|
HN-PT1035A |
Fe37 |
35 |
15 |
M6 |
40 |
|
NdFeB |
Zn |
400 |
|
HN-PT1035B |
Fe37 |
35 |
7 |
M6 |
19 |
|
NdFeB |
Zn |
300 |
|
HN-PT1035C |
Fe37 |
35 |
7 |
M8 |
37 |
|
NdFeB |
Zn |
300 |
|
HN-PT1060 |
Fe37 |
60 |
12 |
M12 |
42.2 |
|
NdFeB |
Zn |
|
|
HN-PT1060A |
Fe37 |
60 |
12 |
M16 |
42.2 |
|
NdFeB |
Zn |
|
|
HN-PT1066 |
Fe37 |
60 |
3 |
M8 |
20 |
|
NdFeB |
Rubber |
195 |
|
HN-PT1080 |
Fe37 |
80 |
12 |
M20 |
42.2 |
|
NdFeB |
Zn |
|
|
HN-PT1088 |
Fe37 |
80 |
3 |
M8 |
20 |
|
NdFeB |
Rubber |
430 |
POT Magnet
Pot Magnet,Neodymium Pot Magnet,Magnet Fishing Neodymium,Rubber Coated Pot Magnets
Honesun Industrial Co.,Limited , https://www.chinamagnetise.com